Parma Ham and Red Pepper Taglierini Inspiration

Jamie Oliver’s recipe of the day continues to pop up on my twitter feed.  Today’s recipe is from Gennaro’s new book “The Pasta Book”.  The recipe below is a very loose interpretation.  I used a few different ingredients which probably make it a different recipe.

Here’s the link to the original: Parma Ham and Red Pepper Taglierini

Here’s what I did:

1 small white onion, diced
1 1/2 red peppers, diced
90 g parma ham
8 leaves (small bunch) of kale
1tbsp oil
red chilli flakes
1 pkg gnocchi
salt and pepper
parmesan cheese

Prepare your ingredients by dicing the white onion, red peppers and finely slicing half the parma ham.  Roughly chop the other half of the ham.  Remove the spine from the kale and roughly chop.

Bring a large pot of water to the boil. When boiling, add the gnocchi, cooking according to the package directions.  Save some of the pasta water just in case.

Put the finely sliced parma ham into a dry frying pan on medium high heat.  Cook until crispy.  Remove from the pan and allow to drain on paper towel.  Add the roughly chopped kale to the pan, cover and cook over medium heat until wilted (3-4 minutes). Stir occasionally.  Remove from the pan. Add 1tbsp of oil to the pan. Cook the onion and red pepper for 2-3 minutes. Add the roughly chopped ham.  Allow to cook for 2-3 minutes. Adding the red chilli flakes, kale and seasoning with salt and pepper.

Combine the gnocchi with the contents of the pan above, loosening with pasta water if it is too sticky. Top with parmesan cheese and the crispy parma ham bits.

Food Friends

Do you have a food friend? Someone you can talk to about what you’ve been cooking lately, what new technique you’ve figured out, or what cookbook you’ve just gotten on loan from the library?  One of my favourite people also happens to be a fabulous cook and someone I would describe as a food friend.  She doesn’t mind (and I think also enjoys) a somewhat lengthy discussion about grocery stores, new cookbooks, and meals for toddlers.  She also re-introduced me to crepes and their versatility in the kitchen.  She fills them with scrambled eggs, with fruit and yogurt, or serves them with lemon juice and icing sugar.  There are a lot of things you can stuff in a crepe.

It was therefore somewhat fortuitous that this season’s LCBO Food and Drink magazine had a recipe for Honey and Curry Roasted Chicken and Brie Crepes with Honey-Ginger Yogurt Sauce.  Clearly it was meant to be.

This recipe has a lot of steps.  One of which I added.  Brine.  Brine your pork chops. Brine your chicken breasts.  Brine it all.  I started brining (not sure that’s a word) a few years ago after reading about it in TheKitchn.  Brining involves allowing a meat to rest in a salt water solution with other aromatics (or not) for about 20 minutes before marinading or cooking.  The meat itself will absorb the extra liquid and some of the salt creating a more flavourful and juicy meat for cooking.  The recommended ratio is 1tbsp salt:1c water.

If you make nothing else, make the marinade for the chicken.  We’ve been eating the leftover chicken on salads all week.  It’s really great.  Just be sure to brine your chicken first.

Honey and Curry Roasted Chicken and Brie Crepes with Honey-Ginger Yogurt Sauce.

4 boneless, skinless chicken breasts
500g brie, sliced into 1/4” thick slices
2 c chopped kale, cooked

Brine:
Heat 3c water and 4 tbsp salt stirring until dissolved.  Add an additional 1c of water.  Submerge the meat in the solution and add any additional aromatics (e.g. bay leaf, peppercorns, star anise etc).  Allow to bring for 20-30 minutes.

Marinade:
2 tbsp olive oil
2 tbsp honey
2 tbsp curry powder (use the good stuff, I got mine from The Spice Trader)
1 tsp ginger powder
1 tsp garlic powder (I used dried, minced garlic)
1 tsp ground cumin
1 tsp ground coriander
1 shallot, diced
1/2 tsp red pepper flakes
freshly ground black pepper
nutmeg

Dry off the brined chicken.  Putting the chicken between two pieces of parchment paper, pound the chicken until roughly an equal thickness.  Combine the marinade ingredients into a paste.  Smear the paste onto both sides of the chicken.  Allow to marinade for up to 2 hours (or the 20 minutes it took my oven to preheat).

Preheat your oven to 350F. Place the chicken breasts in a small roasting pan.  Cover with foil and roast for approximately 1 hour or until juices run clear-ish.  Slice the chicken into 1/4” slices, cover and set aside until ready to use.

Crepes:
2 c all-purpose flour
freshly ground pepper (omit this if you want to use your leftover batter for breakfast crepes)
2 eggs
3 c whole milk
2 tbsp melted butter or olive oil
1 tbsp minced fresh sage leaves (again omit if you want to have breakfast crepes)
non-stick spray (or butter) for cooking

Combine the ingredients (except the sage and the non-stick spray or butter for cooking), using an immersion blender or really strong arms until smooth.  For best performance, let sit 24 hours (in the fridge).  I do not have that kind of patience.  My crepes turned out just fine.

Heat a 10” skillet over medium heat.  When the pan is hot, spray lightly with non-stick spray or a small nub of butter.  Pour 1/4 c of batter into the pan, using your other hand, tilt and swirl the pan to coat with batter.  Flip the crepe when golden brown underneath.  Cook for an additional minutes or so.  Transfer to a plate.

Honey-Ginger Yogurt Sauce:
1/2 c plain greek yogurt
1 tbsp fresh ginger, grated
1 1/2 tsp honey
nutmeg
fresh ground pepper

Combine the yogurt sauce ingredients together in a small bowl.  Season to taste.  Set aside in the fridge until ready to serve.

Assembly:

Lay a crepe on a plate.  Place a few slices of chicken, a slice of brie and some kale onto the centre of the crepe.  Follow the top of the crepe over the filling, fold in the ends and bring the bottom of the crepe up (like a small package).  Set aside, seam side down.  Make the desired number of crepes.

In a large skillet over medium heat, add a knob of butter.  Lay, a few at a time, the filled crepes seam-side down to seal the opening.  Flip once crispy and golden.  Transfer to your serving dish or to individual plates. Top with the Honey-Ginger Yogurt Sauce.

Best Oatmeal Cookies Going

These are my go-to oatmeal cookies.  Best part about them? They’re actually oatmeal, chocolate, cherry and pecan cookies.  I keep going back to this recipe from TheKitchn.  The cookies have turned out every time I (and my 2 year old helper) made them.  At this point, any recipe that can survive a toddler’s measurement and pouring of ingredients is a hit.

Chocolate Chip Oatmeal Cookies with Cherries and Pecans

3/4 cup unsalted butter, room temperature
1 1/2 cups packed dark brown sugar
1 large egg
1 teaspoon vanilla extract
1 cups unbleached all-purpose flour
1/4 cup whole wheat flour
3/4 teaspoon baking powder
1/2 teaspoon baking soda
1/2 teaspoon salt
1 1/4 cups old-fashioned rolled oats
1 cup pecans, toasted and chopped
1 cup dried sour cherries, chopped coarse
8 ounces bittersweet chocolate, chopped into small pieces OR chocolate chips

Preheat your oven to 350F.

Beat the butter until softened and pale yellow.  Add the brown sugar and cream until fluffy. Add the egg and vanilla, beating until well combined.

Sift together (or stir with a whisk) the all purpose flour, whole wheat flour, baking powder, baking soda, and salt.  Add the flour mixture to the wet ingredients.  Stir until combined.  Add the remaining ingredients (oats, pecans, sour cherries, and chocolate).

Using a tablespoon, scoop up balls of cookie dough, roll them into a ball and place on the cookie sheet.  Once the sheet is full, flatten each ball slightly until approximately 1” thick.  Bake for 10 minutes until the cookies are golden around the edges but slightly wet in the middle.  Allow to cool on the pan for ~5 minutes, then cool completely on a rack.

Acorn Squash and Pasta

I didn’t like squash growing up.  This was unfortunate because, growing up on a farm, my parents had a massive garden which produced many many acorn and butternut squash.  It didn’t matter if my mum put butter, brown sugar, or any other lovely toppings on the squash, its presence was resented.  30 odd years later and I’ve come out the other side. Not only do I have a toddler to whom I am reluctant to pass on my food foibles, I have found a recipe which low and behold is very flavourful AND includes squash.  And bacon.

Thekitchn is a great resource for me. It is a wealth of helpful tips, covers food trends, and frequently updates its recipes.  This Penne with Acorn Squash and Pancetta recipe was first published in 2008 and after reviewing the comments, it seems to be a staple in peoples repertoire.  I made a few changes, using sage instead of rosemary, deglazing the pan with white wine instead of broth but all in all I really enjoyed this recipe and will in fact, make acorn squash again soon!

Penne with Acorn Squash and Pancetta

1 acorn squash
1 head of garlic
1/2 lb penne
1/2 lb pancetta, diced (order from your deli counter where they can cut it into 1/4″ slices)
1/2 c white wine
1 tsp dried sage
1/4 c parmesan cheese

Preheat your oven to 400F.  Cut the acorn squash in half and scoop out the seeds.  Cut the squash into 1/2″ thick wedges. Toss the wedges in olive oil, spread the wedges out on a baking sheet and season with salt and pepper.  Slice the top off the head of garlic, exposing the heads of the cloves. Drizzle with olive oil and season with salt and pepper.  Wrap in tin foil and put on the baking sheet along side the squash.  Roast in the oven for 15 minutes, then flip the squash over and roast for an additional 15 minutes.  Remove the squash and allow to cool until you can comfortably remove the peel.  You can leave the garlic in the oven to continue cooking (I turned the oven off but left the garlic in). Once you can comfortably handle it, remove the peel from the squash and pull apart or cut the squash into bite sized chunks.

Bring a large pot of water to a boil and cook the penne.  Once cooked, reserve 1/2 c of pasta water for use in the sauce when draining the pasta.

In a large frying pan, over medium heat, cook the pancetta until the fat is rendered and the pancetta is crispy. While the pancetta is cooking, remove the garlic cloves from their papery sleeves. I used 4 cloves in the recipe and kept the remainders for another day.  Once the pancetta is cooked, remove it from the pan, setting it aside and pour off the excess fat.  Deglaze the pan with wine making sure to pick up the brown bits from the bottom of the pan.  Add the sage and garlic, using the back of a spoon to squish the garlic and incorporate it into the sauce.  Return the pancetta and squash to the pan, tossing in the sauce.

Combine the pasta with the pancetta/squash sauce, stirring in the parmesan cheese.  Add the reserved pasta water 1/4c at a time if necessary (I only used 1/4c total)

Pot Roast Weather

It’s -24 degrees outside this morning.  With the windchill, it’s -32.  That’s cold.  Proper cold.  An image and quote keep appearing on my facebook page this winter, originally from Depressed Alien:
air_hurts_my_face_small_small_posters

I think it pretty accurately sums up how I’m feeling about being in Toronto this winter!

That said, spring is coming.  Wiarton Willie didn’t see his shadow so we should be in the clear 6 weeks from now.  In the meantime, may I suggest a pot roast?

Pot roasts are the gift that keep on giving.  The initial preparation fills your home with a delicious smell and the leftovers will make the rest of your weeknight meals a bit easier to prepare.  This recipe from smittenkitchen is fantastic.  It has five ingredients if you count salt and pepper.  We ate the first iteration over mashed sweet potatoes and the leftovers served over risotto later in the week.

Smitten Kitchen’s Oven Braised Beef with Tomatoes and Garlic (aka my new pot roast foundation recipe)

1 28oz can of tomatoes
5 cloves garlic, still in their papery covers (don’t bother peeling)
1 roast (3ish lb)
salt
pepper

Preheat your oven to 300F.  If using whole tomatoes, use a pair of scissors to cut them into chunks (still in the can). Alternately you could be fancy and use a food processor.  I wasn’t fancy and the scissor trick worked just fine (and saved dishes).  Place the roast in a dutch oven with a tight fitting lid. Pour the tomatoes around the roast, adding the garlic. Season with salt and pepper. Put the roast in the oven for 3-4 hours.  When finished, fish out the garlic cloves and let cool.  Swish the now roasted garlic out of their no longer papery cover and use below in the mashed sweet potatoes (or spread on bread with a bit of butter and salt)

I strained the leftover juices, discarded the tomatoes and used the garlic in the potatoes below.  I saved the juice for the risotto later in the week.  It also kept the leftover meat nicely moist in the fridge.

Mashed Sweet Potatoes

Sweet potatoes can be a bit wet if mashed on their own.  I boil 2 sweet potatoes, cut into large chunks) with 2 russet potatoes.  This seems to balance out the moisture from the sweet potatoes.

2 sweet potatoes
2 potatoes
garlic cloves from above
2 tbsp butter
salt

Peel the sweet potatoes and potatoes. Cut into evenly sized chunks, place in a pot, cover with water and boil until soft (done when a knife will easily pierce the flesh).  Drain and return to the pot.  Add the soft garlic cloves, 2 tbsp of butter and season with salt.  Using a potato masher, get out all your aggression and mash until smooth.

Cornbread and Helper Towers

Recipes that I can easily make while including our 2 year old are worth their weight in gold.  Arguably, most recipes can be toddler friendly from a ‘make’ perspective if you arm yourself with patience (a lot) and you’re ok with a bit (or a lot) of mess.  Today E helped me make this cornbread recipe and it was pretty successful.  She helped by counting scoops as she dumps ingredients into the bowl and stirring the ingredients.

One of my friends passed along a great tip for little hands that want to help with stirring – use a whisk!  Ingredients are much less likely to be flung across the kitchen and much more likely to stay in the bowl.

One of the other things that’s helped with incorporating E into baking and cooking projects has been our helper tower.  416expat built this helper tower designed by Ana White to help corral E safely when she helps at the counter.  There isn’t the same chance that she’ll tip over a chair or fall off.  She doesn’t always want to cook with me, but wants to be in the kitchen with me.  Sometimes, while I’m making dinner, E will bring her lego and build at the counter.  She is able to work at the same level as I am and feel included.  It’s been a bit help!

This cornbread recipe comes via Diana Henry in the Telegraph.  She somehow managed to get it from The Lockhart Restaurant chef, Brad McDonald.  It’s amazing and it’s now my go-to cornbread recipe.  I can highly recommend the maple syrup and butter glaze.

Maple Glazed Cornbread

150g coarse yellow polenta
150g plain flour
50g brown sugar
1 tsp baking-powder
2 large eggs, lightly beaten
240ml milk
30g butter, melted and cooled
15g butter – for the frying pan

Maple Glaze
50g butter, softened
1tbsp maple syrup

Preheat the oven to 415F.  Combine the dry ingredients in a large bowl.  Mix the wet ingredients together.  Make a well in the middle of the dry ingredients, pour the wet ingredients into the well and stir to combine.  In a 9” skillet (cast iron works brilliantly), melt a the 15g portion of butter over medium heat. Once the skillet is hot, pour in the batter.  Put into the oven, baking for 20 minutes.  While the cornbread is baking, combine the glaze ingredients.  When the cornbread is finished, immediately put the glaze on top.  Serve hot.

Spiced Pear Muffins – The Toddler Edition

E likes all things tiny right now.  It might have to do with the addition of her baby brother who she regularly describes as “So Tiny” said in a high pitched squealing nearly two year old voice.  Everything from baby carrots to these muffins is described as being tiny.

These muffins have everything I look for in a muffin, they’re flavourful with a blend of warm spices, moist, and they freeze well.  From thekitchn.com, this recipe is a bit sweet in its original form, so I’ve omitted the sugar topping and dialled back the sugar a bit.  I also used a mix of pear and apples as E had eaten one of the two pears I’d saved for the recipe.  Whatever you do, don’t forget to put the milk in.  It’s vital and without it, the muffins are dry dry dry.  Remember to turn down the oven temperature as soon as you’ve put the muffins into the oven.

I’ve linked back to the original recipe if you’d like to see how they compare.

Spiced Pear Muffins

1/3 c packed brown sugar
1/4 c white sugar
1/2 c butter, softened
2 eggs
1tsp vanilla extract
1 c all-purpose flour
1 c whole wheat flour
2 tsp baking powder
2 tsp cinnamon
1/2 tsp ground ginger
1/4 tsp nutmeg
1/2 tsp salt
1/2 c milk
2-2 1/2 C pears and apples, unpeeled and diced

Preheat your oven to 425F. Beats together the sugars and butter until fluffy.  Add the eggs one at a time, beating until incorporated.  Add in the vanilla extract.  In a separate bowl, combine the flours, baking powder, spices and salt.  Whisk together the dry ingredients.  Combining in thirds, add the dry ingredients, milk and pears to the wet ingredients, stirring after each addition.  Do not over mix.  Put the muffin mixture into tins lined with muffin paper.  Put into the oven and immediately turn the oven down to 400F.  Bake for 20-25 minutes.

In order to make these toddler sized, I use a mini-muffin pan and cut the baking time down dramatically.  I check the muffins after 10 minutes and take them out by 15 minutes of baking time.

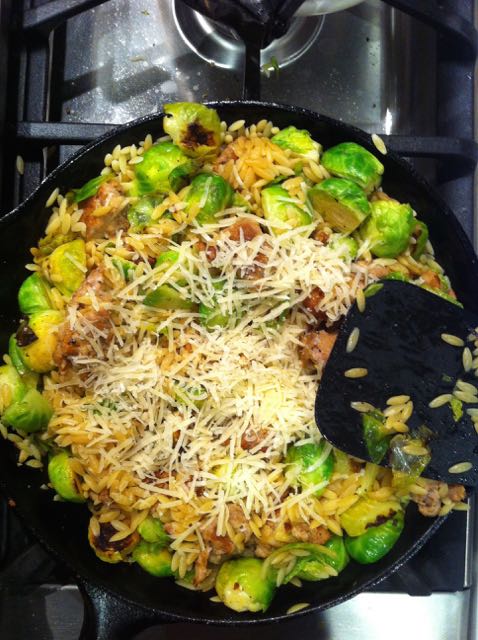
Orzo with Brussels Sprouts and Sausage

While we lived in London we made every effort to say yes.  Yes to invitations to party invitations, to random events happening in the city (how else does one end up on a bee-keepers cooking course in South London), and to social situations that may otherwise send me running scared.  I am, by nature perhaps, a somewhat reluctant social mingler.  Saying yes however, resulted in some of our very favourite memories.  It’s how I ended up joining Thane Prince’s cookbook club and having the opportunity to hear the brilliant Paul Young speak about his experience as a chocolatier in England and it’s how I ended up meeting Nigel Slater at a New Years Day party without actually knowing at the time, who Nigel Slater was (we were pretty fresh off the plane to be fair).

Nigel’s recipes have quickly made it into my regular repertoire and perhaps even more so now that we’ve got a 23 month old and a newborn crying for attention.  His most recent book Eat is stuffed with accessible (relatively quick to put together with ingredients I typically stock in my pantry/fridge) recipes.  Nigel includes variations to many of the recipes which I find helpful particularly when I am light on one ingredient or am wanting to push my toddler’s meal acceptance boundaries!  Nigel also writes a weekly column in the Guardian.  It’s here where I found a new favourite recipe.  His recipe for orzo with brussels sprouts and sausage was fast, easy, and very flavourful.  I used a spicy Italian sausage from our local butcher and some wine that needed to be opened.  Check out the recipe link above for the recipe itself.

The finished product

The finished product

Porchetta

When we were living in the UK we had an opportunity to visit the Umbria region in Italy.  It was there that we first tried Porchetta.  A rather hardcore Italian pork roast, porchetta isn’t the type of thing I would endeavour to recreate at home.  Thankfully Bon Appetite has that covered for me.  Their week night version was very easily recreated within the context of having a new baby at home.  I’ve made a very simple change, using very thinly sliced pancetta instead of the recommended bacon.  I found it just added more flavour than standard bacon.

Bon Appetit’s Weeknight Porchetta

4 garlic cloves finely chopped
1 tbsp coarsely chopped rosemary, plus 4 sprigs
1tbsp fennel seeds, lightly toasted
1 1/2 tsp salt
2 tbsp olive oil, divided
freshly ground pepper
1 1/2 lb pork tenderloin
4 slices pancetta

Preheat the oven to 425. In a mortar and pestle, combine the garlic, rosemary, fennel seeds, salt, pepper, and 1 tbsp olive oil and grind until combined.  Rub this mixture over the tenderloin, leaving it to marinade as long as you have available (overnight ideally, but I had only 30 minutes).  Wrap the tenderloin in the pancetta slices, and place on top of sprigs of rosemary in a large baking pan.  I used a cast iron fry pan.  Drizzle with the remaining 1 tbsp of olive oil.  Roast in the preheated over until an instant read thermometer registers 145degrees. Let rest for 10-15 minutes, slice and serve.

Consider making a pan sauce, removing the pork tenderloin, rosemary sprigs and placing the pan over medium high heat.  Add 1/2 cup of white wine, scraping up the flavour bits from the pan until the wine has reduced by at least half.  Then add another cup of chicken or vegetable stock, again cooking until reduced by half.  Remove from heat, stir in 1 tbsp of butter, check seasoning, adding salt and pepper as needed.

Lentil Soup

So we’ve moved back from England, renovated a house, moved in, gone back to work, had another baby and that’s about that.  I’m still cooking, but am more in need of somewhere to download recipes I’ve found.

This Lentil Soup is amazing.  It uses up whatever vegetables are in your fridge, is hearty without meat, and perhaps most importantly to me at the moment, my 23month old daughter will eat it.  Hurray for proteins she’ll actually consume.  This recipe is from my very lovely cousin Heather.  It is therefore, Heather’s Lentil Soup:

Heather’s Lentil Soup

1 onion, diced
2 cloves garlic, diced
2 ribs of celery, diced
2 carrots, diced
1/2 tsp thyme
2 bay leaves
6 c stock (chicken or vegetable)
1/2 tsp salt
1/2 tsp pepper
1 1/2 c red lentils
any other soft vegetables you have lying around – peppers, zucchini etc
1 tbsp parsley – I rarely have this on hand so leave it out
1 tbsp lemon juice

Combine the onion, garlic, celery, and carrots in a large, heavy bottomed pot over low heat.  Cover and cook for 10 minutes, stirring occasionally.  Add the thyme, bay leaves, stock, salt and pepper, and lentils.  Bring to a boil, then simmer for 30 minutes.  Add any other vegetables, cooking an additional 2-3 minutes as needed.  Add the parsley and lemon juice.  Serve as is or blend using an immersion blender or food processor.